Easy No Bake Berry Icebox Cake to Try Today
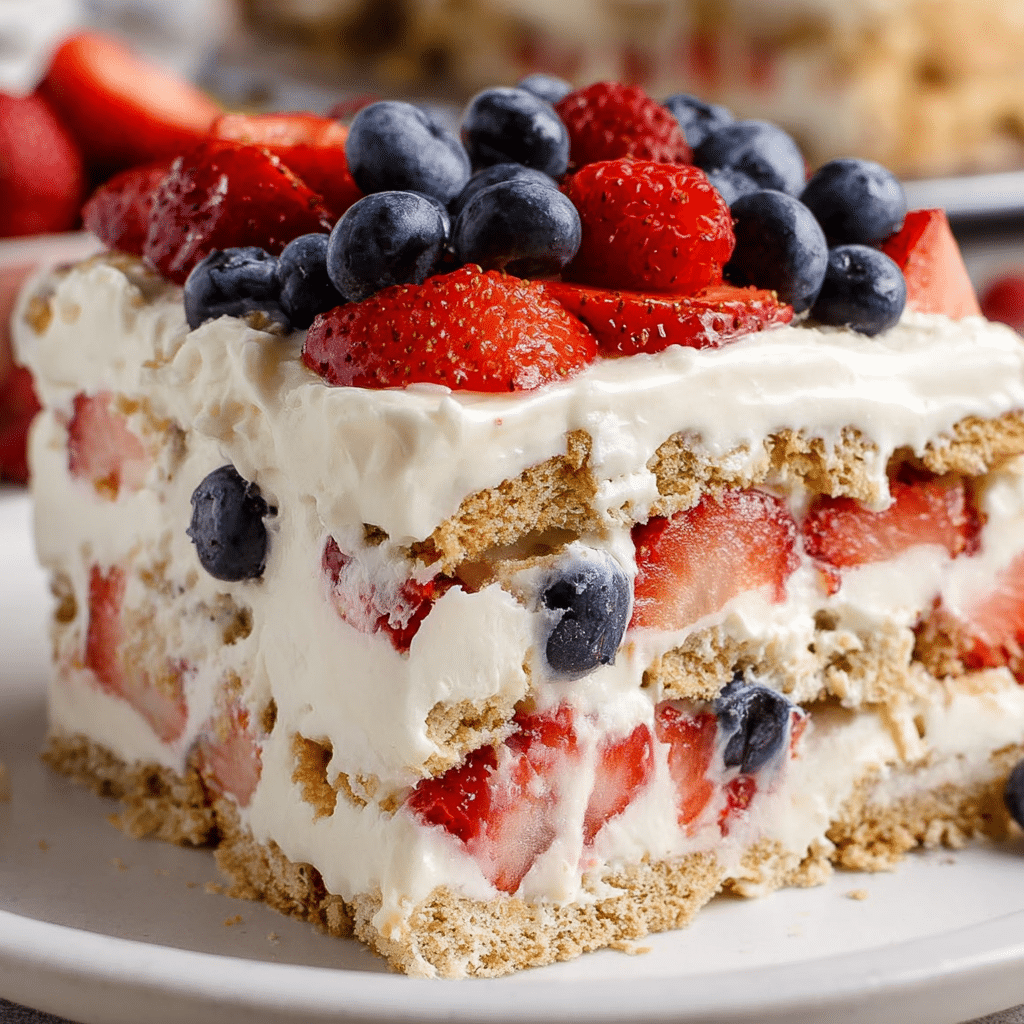
Discover a refreshing No Bake Berry Icebox Cake recipe that’s quick, simple, and perfect for any occasion. This delightful dessert combines layers of fresh berries, creamy filling, and crisp cookies, all coming together without the need for an oven. Whether you’re hosting a summer barbecue or craving a sweet treat after dinner, this No Bake Berry Icebox Cake is sure to impress with its vibrant flavors and effortless preparation.
Why You’ll Love This Recipe
- Effortless Preparation: No need for baking means you can whip this up in no time without heating up the kitchen.
- Refreshing Flavor: The combination of fresh berries and creamy layers offers a light yet indulgent taste perfect for warm days.
- Versatile Serving: Ideal for celebrations, casual gatherings, or an easy dessert option any day of the week.
- Beautiful Presentation: Layers of colorful berries and cream make this cake as beautiful as it is delicious.
- Customizable Ingredients: Easily adapt with your favorite berries or dietary preferences to suit your taste.
Ingredients You’ll Need
This No Bake Berry Icebox Cake relies on simple, quality ingredients that build taste, texture, and visual appeal. Each component plays its part in creating the perfect balance of crunch, creaminess, and freshness.
- Fresh Berries: Choose strawberries, blueberries, raspberries, or a mix for a burst of natural sweetness and vibrant colors.
- Whipped Cream: Use freshly whipped cream or stabilized whipped topping to create a luscious and airy filling.
- Vanilla Extract: A splash enhances the cream’s flavor with a subtle warmth and sweetness.
- Graham Crackers or Shortbread Cookies: These provide the crisp, buttery layers that soften while chilling.
- Sugar: A small amount sweetens the filling and balances the tartness of the berries.
- Lemon Zest (optional): Adds a bright citrus note that complements the berries beautifully.
Variations for No Bake Berry Icebox Cake
Feel free to get creative with this recipe! The No Bake Berry Icebox Cake is wonderfully adaptable based on what’s in your pantry, dietary needs, or flavor cravings.
- Dairy-Free Option: Substitute coconut cream or a plant-based whipped topping for a vegan-friendly dessert.
- Different Fruit Combos: Swap berries for peaches, mangoes, or kiwi to mix up the fresh fruit component.
- Add a Chocolate Layer: Sprinkle mini chocolate chips or drizzle melted chocolate between layers for added indulgence.
- Use Gluten-Free Cookies: Choose gluten-free graham crackers or cookies to make it safe for gluten-sensitive eaters.
- Incorporate Nuts: Add chopped pistachios or almonds for crunch and flavor contrast inside the layers or as a topping.

How to Make No Bake Berry Icebox Cake
Step 1: Prepare the Whipped Cream Filling
Start by gently whipping heavy cream with a bit of sugar and vanilla extract until soft peaks form. This creamy filling will hold the cake layers together and add a silky texture.
Step 2: Rinse and Slice the Berries
Wash all berries thoroughly and slice larger berries like strawberries into thin pieces to create even layers and ensure every bite is balanced.
Step 3: Layer the Cake
In a glass dish or cake pan, begin with a layer of graham crackers or cookies. Spread an even layer of the whipped cream over the crackers, then scatter berries evenly on top. Repeat the layers until all ingredients are used, finishing with a final cream layer and a decorative berry topping.
Step 4: Chill in the Refrigerator
Cover the assembled cake and let it chill in the refrigerator for at least 4 hours or overnight. This step softens the crackers and melds all the layers into a deliciously unified dessert.
Step 5: Serve and Enjoy
Once chilled, slice your No Bake Berry Icebox Cake with a sharp knife and serve cold, enjoying the perfect blend of creamy, juicy, and crunchy textures.
Pro Tips for Making No Bake Berry Icebox Cake
- Use Cold Ingredients: Keep your heavy cream and mixing bowl chilled for the best whipped cream texture.
- Layer Thoughtfully: Distribute berries and cream evenly to ensure every slice tastes balanced and beautiful.
- Choose Fresh and Ripe Berries: The flavor of the fruit makes a huge difference, so pick the best quality you can find.
- Chilling Time Matters: Allow ample fridge time for optimal texture and flavor fusion.
- Prep Ahead: Make the dessert a day in advance to save time and enhance the flavors.
How to Serve No Bake Berry Icebox Cake
Garnishes
Decorate the top with fresh mint leaves, a dusting of powdered sugar, or extra whole berries to enhance the visual appeal and add subtle contrasting flavors.
Side Dishes
Serve alongside a scoop of vanilla ice cream, a light fruit salad, or a refreshing herbal iced tea to complement the cake’s fruity and creamy profile.
Creative Ways to Present
Try serving the cake in individual mason jars or clear glasses to show off the colorful layers, making for a charming and personal dessert experience.
Make Ahead and Storage
Storing Leftovers
Cover the cake tightly with plastic wrap or transfer leftovers to an airtight container and store in the refrigerator for up to 3 days to keep freshness intact.
Freezing
Freezing is not recommended as the texture of the whipped cream and berries changes drastically, but you can freeze individual graham crackers or cookies in advance.
Reheating
This cake is best enjoyed chilled and does not require reheating; bringing it to room temperature slightly before serving can help enhance the flavors.
FAQs
Can I use frozen berries for this recipe?
Yes, but be sure to thaw and drain them well to avoid excess moisture, which can make the cake soggy.
How long can I store the No Bake Berry Icebox Cake in the fridge?
It stays fresh for up to three days when properly covered, making it a great make-ahead dessert.
Can I make this cake gluten-free?
Absolutely! Just swap regular graham crackers for gluten-free varieties to keep it delicious and safe for gluten-sensitive eaters.
Is this dessert suitable for kids?
Yes, it’s a kid-friendly treat with fresh fruit and creamy layers that most children enjoy.
What can I substitute for heavy cream?
You can use coconut cream or a plant-based whipped topping for a dairy-free version, though texture and flavor may vary slightly.
Final Thoughts
Easy, vibrant, and delicious, this No Bake Berry Icebox Cake is a dessert you’ll want to keep in your recipe collection. Its simplicity never sacrifices flavor, making it perfect for any occasion. Give it a try today and enjoy the sweet layers of creamy delight paired with fresh berries in a cake that’s truly a crowd-pleaser!
Related Posts
- Why Peanut Butter M&M’s Cake Will Wow You
- Why Buttermilk Pie Is a Southern Classic
- Easy Strawberry Crunch Cheesecake Cones Recipe
No Bake Berry Icebox Cake
A refreshing and easy No Bake Berry Icebox Cake featuring layers of fresh berries, creamy whipped filling, and crisp cookies. Perfect for warm days and any occasion, this vibrant dessert requires no oven, making it quick and effortless to prepare while delivering a delightful combination of flavors and textures.
- Prep Time: 15 minutes
- Cook Time: 0 minutes
- Total Time: 4 hours 15 minutes (including chilling time)
- Yield: 8-10 servings 1x
- Category: Dessert
- Method: No Bake
- Cuisine: American
- Diet: Gluten Free (with gluten-free cookies option)
Ingredients
Fresh Berries
- Strawberries, blueberries, raspberries, or a mixed selection (quantity as desired, about 2-3 cups total)
Whipped Cream Filling
- 2 cups heavy cream
- 2–3 tablespoons sugar
- 1 teaspoon vanilla extract
Cookies
- Graham crackers or shortbread cookies, about 2-3 sleeves (around 40-50 cookies)
Optional Ingredients
- 1 teaspoon lemon zest (optional)
- Mini chocolate chips or melted chocolate (for chocolate layer, optional)
- Chopped pistachios or almonds (optional)
Instructions
- Prepare the Whipped Cream Filling: Gently whip the cold heavy cream with sugar and vanilla extract until soft peaks form, creating a silky, luscious filling that will hold the cake layers together.
- Rinse and Slice the Berries: Thoroughly wash all berries. Slice larger berries, such as strawberries, into thin pieces to ensure even layering and balanced bites.
- Layer the Cake: In a glass dish or cake pan, start with a layer of graham crackers or cookies. Spread an even layer of whipped cream over the cookies, then scatter berries uniformly on top. Repeat layering with cookies, cream, and berries until ingredients are used, finishing with a final cream layer topped decoratively with berries.
- Chill in the Refrigerator: Cover the assembled cake and refrigerate for at least 4 hours or overnight to allow the cookies to soften and the flavors to meld into a unified dessert.
- Serve and Enjoy: Use a sharp knife to slice the chilled cake and serve cold, savoring the blend of creamy, juicy, and crunchy textures.
Notes
- Use cold ingredients for the best whipped cream texture.
- Distribute berries and cream evenly for balanced flavors in every slice.
- Choose fresh, ripe berries for optimal taste.
- Allow sufficient chilling time for ideal texture and flavor fusion.
- Make the cake a day ahead to save time and enhance flavors.
- For dairy-free versions, substitute coconut cream or plant-based whipped toppings.
- Swap graham crackers for gluten-free cookies to accommodate dietary needs.
- Thaw and drain frozen berries well before use to prevent sogginess.
Nutrition
- Serving Size: 1 slice (approx. 1/10th of cake)
- Calories: 250
- Sugar: 18g
- Sodium: 100mg
- Fat: 15g
- Saturated Fat: 9g
- Unsaturated Fat: 4g
- Trans Fat: 0g
- Carbohydrates: 22g
- Fiber: 3g
- Protein: 3g
- Cholesterol: 50mg
Keywords: No Bake, Berry Icebox Cake, Fresh Berries, Whipped Cream, Easy Dessert, Summer Dessert, Gluten-Free Option, Vegan Option