How to Make Chicken Kiev with Garlic Butter

If you adore rich, buttery flavors wrapped in crispy golden perfection, then this Chicken Kiev with Garlic Butter recipe is about to become your new favorite comfort dish. Combining tender chicken breasts with a luscious, garlicky butter center, this classic recipe offers a deliciously indulgent experience that’s surprisingly easy to master at home. Whether you’re cooking for a special occasion or simply craving something extraordinary, Chicken Kiev with Garlic Butter delivers a perfect balance of crispy exterior and flavorful, melt-in-your-mouth filling.
Why You’ll Love This Recipe
- Irresistibly Crispy Texture: The perfectly breaded coating creates a crisp shell that contrasts beautifully with the juicy chicken inside.
- Rich Garlic Butter Filling: A deliciously creamy center bursting with fresh garlic flavor elevates every bite.
- Simple Ingredients: Using straightforward pantry staples makes this dish both accessible and budget-friendly.
- Perfect for Entertaining: Impress guests with an elegant, restaurant-quality meal right at home.
- Versatile and Adaptable: You can tweak the seasonings or side dishes easily to suit any taste or diet.
Ingredients You’ll Need
Gathering simple, fresh ingredients is the secret to making Chicken Kiev with Garlic Butter that tastes homemade and unforgettable. Each component plays a key part in building that perfect harmony of flavor, crispness, and moistness.
- Chicken Breasts: Choose boneless, skinless breasts for easy rolling and even cooking.
- Butter: Use unsalted butter for a rich, creamy filling that won’t overpower the garlic flavor.
- Fresh Garlic: Minced garlic infuses the butter with robust aromatic notes.
- Parsley: Fresh chopped parsley adds a touch of color and freshness to the butter mixture.
- Flour: For dredging the chicken to help the coating stick perfectly.
- Eggs: Beaten eggs bind the breadcrumbs to the chicken for a sturdy crust.
- Bread Crumbs: Use panko for an extra crunchy texture.
- Salt and Pepper: To season both the chicken and the garlic butter filling.
- Oil for Frying: Choose a neutral oil with a high smoke point like vegetable or canola oil for frying crispiness.
Variations for Chicken Kiev with Garlic Butter
Feel free to switch up this recipe to suit your tastes or dietary needs. Chicken Kiev with Garlic Butter is wonderfully flexible and can be tailored easily with a few twists.
- Herb Butter Blend: Swap parsley for dill, chives, or tarragon to bring new herbal notes to the filling.
- Spicy Kick: Add chili flakes or hot paprika to the garlic butter for a little heat.
- Gluten-Free: Use gluten-free flour and breadcrumbs to accommodate dietary restrictions without sacrificing texture.
- Oven-Baked Option: Skip frying by baking the Chicken Kiev for a lighter version with less oil.
- Cheese-Stuffed: Add a layer of mozzarella or cream cheese for an extra creamy, gooey surprise inside.

How to Make Chicken Kiev with Garlic Butter
Step 1: Prepare the Garlic Butter Filling
Start by softening the unsalted butter at room temperature. Then mix in minced fresh garlic, chopped parsley, salt, and pepper. Shape this garlic butter mixture into small logs or balls, wrap them in plastic wrap, and freeze until firm—this helps keep the butter inside the chicken as it cooks.
Step 2: Flatten the Chicken Breasts
Lay each chicken breast between two pieces of cling film or parchment paper and gently pound with a meat mallet or rolling pin until about 1/4 inch thick. This creates a thin surface that’s easy to roll around the butter and ensures even cooking.
Step 3: Assemble the Kievs
Place a frozen butter piece onto the center of the flattened chicken breast. Carefully fold the sides over and roll tightly to enclose the butter complete, sealing any edges to avoid leakage.
Step 4: Coat the Chicken
Dredge each rolled chicken piece in flour, dip it into the beaten eggs, and then thoroughly coat with breadcrumbs. For an extra crispy layer, repeat the egg and breadcrumb step once more.
Step 5: Fry or Bake
Heat the oil in a deep pan to medium-high heat. Gently fry the chicken Kievs for 4-5 minutes on each side until golden brown and cooked through. Alternatively, bake in a preheated oven at 375°F (190°C) for 25-30 minutes for a lighter option.
Step 6: Rest and Serve
Allow the Chicken Kiev with Garlic Butter to rest a few minutes so the juices settle. This keeps the filling from spilling out immediately when cut.
Pro Tips for Making Chicken Kiev with Garlic Butter
- Freeze the Butter: Freezing the garlic butter makes it easier to handle and prevents it from melting too quickly during cooking.
- Seal Edges Well: Ensure every fold of chicken overlaps and pinches tightly to avoid butter leaking out while frying.
- Use Panko Breadcrumbs: They add a light, airy crunch that really elevates the texture.
- Control Oil Temperature: Keep the oil around 350°F to avoid burning the crust while undercooking the chicken.
- Rest Before Cutting: Letting the dish rest prevents the garlic butter from spilling out too fast, keeping the plating clean and appetizing.
How to Serve Chicken Kiev with Garlic Butter
Garnishes
A sprinkle of fresh parsley or chives brightens the dish and adds an inviting pop of green that complements the golden brown crust.
Side Dishes
Classic mashed potatoes, buttery steamed vegetables, or a fresh green salad pair perfectly with Chicken Kiev with Garlic Butter, balancing indulgence with freshness.
Creative Ways to Present
Try serving on a wooden board with lemon wedges and a drizzle of herb sauce for a rustic yet elegant look. Alternatively, slice into medallions to showcase the beautiful garlic butter core for a stunning presentation.
Make Ahead and Storage
Storing Leftovers
Refrigerate any leftover Chicken Kiev with Garlic Butter in an airtight container for up to 2 days to maintain moisture and freshness.
Freezing
You can freeze the assembled but uncooked Kievs, tightly wrapped and placed in a freezer-safe bag, for up to 1 month, perfect for quick weeknight meals later.
Reheating
Reheat leftover or frozen Chicken Kievs in an oven set to 350°F (175°C) until warmed through, ensuring the crispy coating stays intact and the butter filling melts beautifully once again.
FAQs
Can I use chicken thighs instead of breasts?
Yes! Boneless, skinless chicken thighs can be used, but because they’re thicker and fattier, adjust cooking times to ensure they are fully cooked and the garlic butter melts properly.
How do I prevent the garlic butter from leaking out?
Freezing the garlic butter first and securely sealing the chicken edges by overlapping and pressing firmly helps contain the filling during cooking.
What’s the best oil for frying Chicken Kiev with Garlic Butter?
Neutral oils like vegetable, canola, or sunflower oil work best because of their high smoke points and mild flavors that don’t overpower the dish.
Can I bake the Chicken Kiev instead of frying?
Absolutely! Baking provides a healthier alternative and still yields crispy results if you use panko breadcrumbs and lightly oil the surface before baking.
How do I know when the Chicken Kiev is fully cooked?
The internal temperature should reach 165°F (74°C), and the exterior should be golden brown. Allow resting time to ensure juices redistribute and the garlic butter filling stays intact.
Final Thoughts
Making Chicken Kiev with Garlic Butter at home is a rewarding experience that satisfies both your taste buds and cooking confidence. With its crispy golden crust and rich, flavorful butter center, this recipe is sure to impress anyone lucky enough to enjoy it. So gather your ingredients, roll up your sleeves, and get ready to savor one of the most delightful dishes you’ll make all year!
Related Posts
PrintChicken Kiev with Garlic Butter
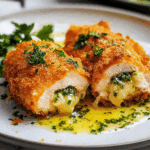
Chicken Kiev with Garlic Butter is a classic comfort dish featuring tender boneless chicken breasts wrapped around a rich, garlicky butter filling, coated in a crispy panko crust. This recipe combines indulgent flavors with a perfectly crispy exterior and a melt-in-your-mouth filling, easy to prepare at home for elegant meals or cozy family dinners.
- Prep Time: 20 minutes (plus freezing time for garlic butter: 1 hour)
- Cook Time: 10-12 minutes frying or 25-30 minutes baking
- Total Time: 1 hour 30 minutes including freezing
- Yield: 4 servings 1x
- Category: Appetizers
- Method: Frying or Baking
- Cuisine: European
- Diet: Gluten Free (with substitutions)
Ingredients
Chicken
- 4 boneless, skinless chicken breasts
Garlic Butter Filling
- 4 tbsp unsalted butter, softened
- 3 cloves fresh garlic, minced
- 2 tbsp fresh parsley, chopped
- 1/2 tsp salt
- 1/4 tsp black pepper
Coating
- 1 cup all-purpose flour (or gluten-free flour for GF option)
- 2 large eggs, beaten
- 1 1/2 cups panko bread crumbs (or gluten-free breadcrumbs)
- Salt and pepper to taste
- Oil for frying (vegetable, canola, or sunflower oil)
Instructions
- Prepare the Garlic Butter Filling: Soften the unsalted butter at room temperature. Mix in the minced fresh garlic, chopped parsley, salt, and pepper until well combined. Shape the garlic butter mixture into small logs or balls. Wrap each in plastic wrap and freeze until firm to help keep the butter inside the chicken during cooking.
- Flatten the Chicken Breasts: Place each chicken breast between two sheets of cling film or parchment paper. Gently pound with a meat mallet or rolling pin until about 1/4 inch thick to create an even, thin surface for rolling.
- Assemble the Kievs: Place a frozen piece of garlic butter in the center of each flattened chicken breast. Fold the sides over the butter and roll tightly to enclose it completely, making sure to seal the edges well to prevent leakage.
- Coat the Chicken: Dredge each rolled chicken piece first in flour, then dip into the beaten eggs, and finally coat thoroughly with panko breadcrumbs. For extra crispiness, repeat the egg and breadcrumb coating once more.
- Fry or Bake: For frying, heat oil in a deep pan over medium-high heat (around 350°F / 175°C). Fry the Chicken Kievs gently for 4-5 minutes on each side until golden brown and cooked through. Alternatively, to bake, preheat the oven to 375°F (190°C) and bake for 25-30 minutes until crisp and fully cooked.
- Rest and Serve: Let the Chicken Kiev rest for a few minutes after cooking. This allows the juices to settle and prevents the garlic butter from spilling out immediately when cut.
Notes
- Freeze the garlic butter filling to make handling easier and to prevent premature melting during cooking.
- Seal the chicken edges tightly by overlapping and pressing firmly to avoid leakage of the butter.
- Using panko breadcrumbs provides a lighter, crunchier texture compared to regular breadcrumbs.
- Maintain oil temperature at about 350°F to ensure the crust fries to golden perfection without burning.
- Resting the Chicken Kiev after cooking keeps the butter filling intact and the juices redistributed.
Nutrition
- Serving Size: 1 Chicken Kiev
- Calories: 450 kcal
- Sugar: 1 g
- Sodium: 420 mg
- Fat: 28 g
- Saturated Fat: 12 g
- Unsaturated Fat: 14 g
- Trans Fat: 0 g
- Carbohydrates: 18 g
- Fiber: 1 g
- Protein: 35 g
- Cholesterol: 130 mg
Keywords: Chicken Kiev, garlic butter chicken, crispy chicken recipe, comfort food, panko crust, easy chicken recipe, gluten free chicken, baked chicken Kiev