5 Delicious Easter Dirt Pudding Jars Recipes
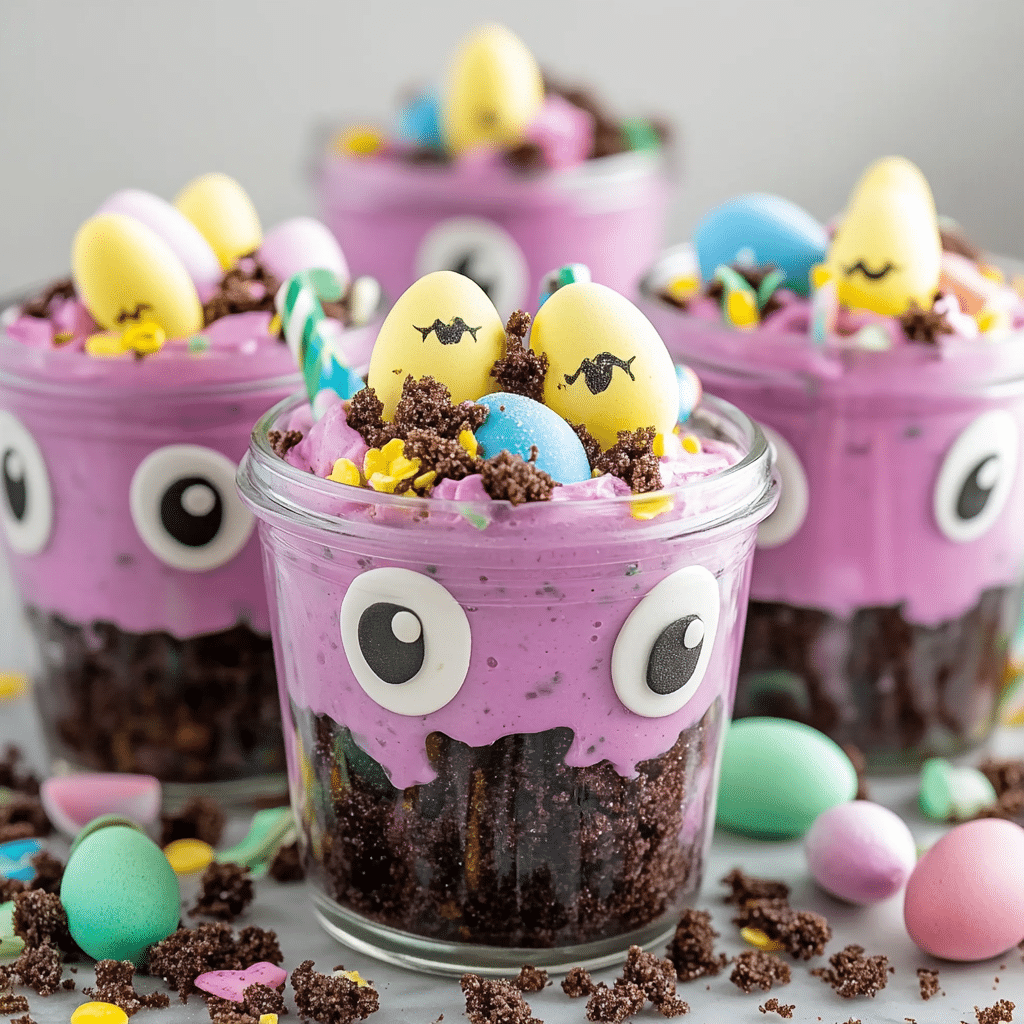
If you’re searching for a fun and irresistible dessert this season, these Easter Dirt Pudding Jars are exactly what you need to make your celebrations unforgettable. Combining creamy layers of rich pudding, crunchy cookie crumbs, and playful garnishes, these jars offer a delightful mix of textures and flavors that everyone will adore. Perfect for festive gatherings, these easy-to-make treats bring both charm and sweetness to your Easter table, making them a hit with kids and adults alike.
Why You’ll Love This Recipe
- Layered Delight: The combination of smooth pudding and crunchy crumbs creates an addictive texture contrast in every bite.
- Kid-Friendly Fun: The colorful and playful presentation makes it an instant favorite among children and family get-togethers.
- Simple Preparation: Requires no baking, sparing you time while still impressing your guests with delicious results.
- Portable Portions: The jars make serving and sharing easy, perfect for potlucks or picnic-style Easter celebrations.
- Highly Customizable: You can easily adapt ingredients or toppings based on personal preferences or dietary needs.
Ingredients You’ll Need
All you need are a handful of simple, wholesome ingredients that work wonderfully together. Each component adds its own flair, from creamy richness to that irresistible “dirt” look and feel that makes these jars so special.
- Instant Pudding Mix: Vanilla or chocolate flavors provide the creamy base that’s both smooth and fragrant.
- Milk: Used to mix with pudding powder to achieve that luscious, velvety texture.
- Crushed Chocolate Sandwich Cookies: These add the signature “dirt” texture and a satisfying crunch.
- Whipped Cream: For a light, airy topping that balances the pudding’s richness.
- Easter-Themed Candy or Gummies: To bring vibrant color and festive flair to each jar.
- Optional: Small Plastic Easter Eggs or Jelly Beans: Great for decoration and extra sweetness.
Variations for Easter Dirt Pudding Jars
The beauty of Easter Dirt Pudding Jars lies in their flexibility — swapping out a few ingredients can give you a whole new twist. Feel free to experiment and find your personal favorite version!
- Healthier Option: Use Greek yogurt instead of whipped cream for a protein boost and tangy flavor.
- Fruit Twist: Add fresh strawberries or blueberries between layers for natural sweetness and freshness.
- Peanut Butter Delight: Stir a spoonful of peanut butter into the pudding for a rich, nutty surprise.
- Dairy-Free Version: Use coconut milk and dairy-free pudding mix to accommodate dietary restrictions.
- Mint Chocolate: Mix crushed mint candies into crumb topping for a refreshing zing.

How to Make Easter Dirt Pudding Jars
Step 1: Prepare the Pudding
Start by whisking the instant pudding mix with cold milk according to package instructions, usually around 2 minutes until thickened. Chill it in the refrigerator to set while preparing other ingredients.
Step 2: Crush the Cookies
Place chocolate sandwich cookies in a resealable bag and crush them into fine crumbs using a rolling pin or food processor—these crumbs will serve as your “dirt.”
Step 3: Assemble the Layers
In each jar, add a layer of cookie crumbs, followed by a generous scoop of pudding. Repeat until the jar is nearly full, finishing with cookie crumbs on top to resemble soil.
Step 4: Top with Whipped Cream and Decorations
Pipe or spoon whipped cream over the “dirt” layer, then adorn with Easter-themed candies, gummies, or tiny plastic eggs to bring your pudding jars to life.
Step 5: Chill Before Serving
Place jars in the refrigerator for at least 1 hour to let all the flavors meld and the pudding to firm up for the best experience.
Pro Tips for Making Easter Dirt Pudding Jars
- Use Fresh Pudding Mix: Ensure your instant pudding isn’t expired for the creamiest texture.
- Crush Cookies Finely: Finer crumbs give a realistic dirt appearance and better mouthfeel.
- Layer Strategically: Alternating pudding and crumbs thoughtfully enhances flavor with every spoonful.
- Chill Thoroughly: Overnight chilling improves texture and depth of flavor remarkably.
- Decorate With Care: Use small candies that won’t overpower the dessert but add visual charm.
How to Serve Easter Dirt Pudding Jars
Garnishes
Sprinkle colorful sprinkles, edible flowers, or miniature chocolate bunnies on top of the whipped cream to elevate the festive feel and add extra visual appeal.
Side Dishes
Pair these jars with light finger sandwiches or fresh fruit platters to balance the richness and keep your Easter spread diverse and inviting.
Creative Ways to Present
Serve the pudding jars in mason jars tied with pastel ribbons or place them inside a decorative Easter basket to amplify that charming, homemade vibe everyone will adore.
Make Ahead and Storage
Storing Leftovers
Keep leftover Easter Dirt Pudding Jars tightly covered in the refrigerator for up to 3 days to maintain freshness and texture.
Freezing
While not ideal for freezing due to the pudding’s delicate texture, you can freeze the cookie crumbs separately and add them fresh when assembling the dessert later.
Reheating
These jars are best enjoyed cold. Avoid reheating as it may affect the pudding’s consistency and the crunchiness of the cookie “dirt.”
FAQs
Can I use homemade pudding instead of instant mix?
Absolutely! Homemade pudding works beautifully if you prefer a more natural flavor and control over ingredients; just ensure it thickens enough for layering.
Are Easter Dirt Pudding Jars suitable for kids?
Yes, they’re perfect for kids, fully fun to make and eat, plus the jars are portion-controlled to keep things neat and manageable.
Can I make these desserts vegan?
Yes, by using dairy-free pudding mixes, plant-based milk, and coconut whipped cream, you can easily make a delicious vegan-friendly version.
How long do Easter Dirt Pudding Jars last in the fridge?
They stay fresh for up to 3 days when properly covered to protect against moisture and odors in the refrigerator.
What’s the best way to crush cookies for this recipe?
Use a rolling pin over a sealed plastic bag or a food processor for quick and even crumbling, avoiding large chunks for the best texture.
Final Thoughts
Easter Dirt Pudding Jars are a delightful, crowd-pleasing dessert that’s as fun to make as it is to eat. Whether you’re hosting a festive family brunch or a casual potluck, these sweet, creamy, and crunchy layered treats never disappoint. Dive into this recipe, customize to your heart’s desire, and watch your loved ones enjoy every spoonful of this charming Easter favorite!
Related Posts
PrintEaster Dirt Pudding Jars
Easter Dirt Pudding Jars are a fun and irresistible layered dessert combining creamy instant pudding, crunchy chocolate cookie crumbs, and festive Easter-themed decorations. These no-bake, kid-friendly treats are easy to prepare, customizable, and perfect for holiday gatherings, potlucks, and picnics.
- Prep Time: 15 minutes
- Cook Time: 0 minutes
- Total Time: 1 hour 15 minutes
- Yield: 6 jars
- Category: Desserts
- Method: No-Bake
- Cuisine: American
- Diet: Vegetarian
Ingredients
Main Ingredients
- Instant Pudding Mix (Vanilla or Chocolate) – 1 package (3.4 oz)
- Milk – 2 cups (cold, for pudding preparation)
- Chocolate Sandwich Cookies (crushed) – 15-20 cookies
- Whipped Cream – 1 cup for topping
- Easter-Themed Candy or Gummies – 1/2 cup for garnish
- Optional: Small Plastic Easter Eggs or Jelly Beans – for decoration
Variations (Optional)
- Greek Yogurt – substitute whipped cream (1 cup)
- Fresh Strawberries or Blueberries – 1/2 cup, sliced
- Peanut Butter – 1-2 tbsp, stirred into pudding
- Coconut Milk – 2 cups, for dairy-free version
- Dairy-Free Pudding Mix – 1 package
- Crushed Mint Candies – 1/4 cup, mixed into cookie crumbs
Instructions
- Prepare the Pudding: Whisk the instant pudding mix with cold milk for about 2 minutes until thickened. Chill in the refrigerator to set while you prepare other ingredients.
- Crush the Cookies: Place chocolate sandwich cookies in a resealable bag and crush into fine crumbs using a rolling pin or food processor to create the “dirt” texture.
- Assemble the Layers: In each jar, start with a layer of cookie crumbs, then add a generous scoop of pudding. Repeat layering until the jar is nearly full. Finish with a top layer of cookie crumbs to resemble soil.
- Top with Whipped Cream and Decorations: Pipe or spoon whipped cream over the cookie crumb layer. Decorate with Easter-themed candies, gummies, or small plastic eggs to add festive charm.
- Chill Before Serving: Refrigerate the assembled jars for at least 1 hour to let flavors meld and pudding to firm for optimal texture.
Notes
- Use fresh instant pudding mix for the creamiest texture.
- Crush cookies finely for a realistic dirt appearance and better mouthfeel.
- Alternate layers thoughtfully for balanced flavor in every spoonful.
- Chill overnight for enhanced texture and flavor depth.
- Use small candies that complement the dessert without overpowering it visually or taste-wise.
Nutrition
- Serving Size: 1 jar (approx. 1 cup)
- Calories: 280
- Sugar: 24g
- Sodium: 150mg
- Fat: 12g
- Saturated Fat: 7g
- Unsaturated Fat: 3g
- Trans Fat: 0g
- Carbohydrates: 36g
- Fiber: 2g
- Protein: 4g
- Cholesterol: 25mg
Keywords: Easter dessert, pudding jars, no-bake dessert, layered pudding, kid-friendly dessert, Easter treats, chocolate cookies, whipped cream